lunes, 20 de mayo de 2013

nudos celtas: olias

¡Buenas! vamos por fin con otro nudo celta, Olias Knot ¡Tenía muchisimas ganas de hacer este! ya llevaba bastante tiempo con esta idea rondandome por la cabeza. Es un nudo muy decorativo que básicamente te pide que cuelgues algo de el a mi me apetecía una piedrecita de ámbar y no veais lo que me costó encontrar algo... pero en fin, estoy más que encantada con el resultado ^.^

Hi! today it's another entry of celtic knots, Olias, is called this one. It's a very decorative knot, that is, literally, asking you to hang something on it. This time I tried amber, and I'm really happy with the result ^.^


Decidí coger otro hilo, porque creía que se iba a ver mejor, pero no se si al final va a ser más lio...

I thought that with this kind of cord it'd be easier to see the steps, but I think it was even worse...


Empezamos haciendo un loop con la cuerda hacia abajo y pasamos el hilo que queda en la derecha por encima, no pasandolo por dentro.

Start by making a loop and then passin the right cord over it, not through it.


Ahora cogemos el hilo de la izquierda y lo pasamos por debajo del loop, por encima del hilo que colocamos antes y otra vez por debajo del loop. Al hacerlo deberíamos tener una figura como esa.

Now take the left cord and pass it under the loop, over the other cord and under the loop again. You should end with a figure like that.


¡Atención que aqui empieza el lio! Le damos la vuelta a la figura y colocamos el hilo que queda a la derecha por debajo de la abertura que queda a la derecha.

Here starts the tricky part! turn the figure and place the right cord under the right loop.


Ahora con el hilo de la derecha pasamos por encima del loop, debajo del otro hilo y encima de nuevo del loop. Recolocando un poco los hilos te debería quedar algo parecido a la foto.

Now with the left cord, pass it over the loop, under the right cord and again over the loop. The result should be something like that.


Llegamos ya al paso final. Cogiendo el hilo que antes habíamos colocado por debajo, lo pasamos por la abertura que se ha formado en el centro con el otro hilo, luego lo pasamos por encima de donde pasaba el hilo, y por debajo del loop donde estaba. Ug, esto es un poco raro de explicar, espero que en las fotos se vea mas o menos bien...

Ok, this is the last step. Take the cord we had put down before and pass ti through the hole that has been formed in the middle, and now over the other cord and under the last loop.


Ahora solo tienes que ajustar un poco más los hilos y ¡listo! nudo terminado. Con este hilo no queda especialmente guapo, normalmente se hacen con paracord, pero yo encontré este en los chinos que es mas finito (y mas suave y más guapito ^.^) que para mi gusto queda mejor, pero eso ya es cosa de cada uno!

Adjust a bit the knot, and here you have it! This knot are usually made with paracord, but you can experiment with other kinds. For example, I dicovered this kind of felty, soft cord, that I tihnk looks really good for this.


sábado, 11 de mayo de 2013

DIY: gorro con telar circular// hat with circular loom

¡Tenia que haber subido esta entrada hace mucho! pero entre que parecía que el tiempo iba a mejor, que empeoraba... y asi unas cuantas veces, no me decidía. Bueno, finalmente aqui la teneis, si todavía hace frio donde vivís podeis probar a hacerlo, y si ya empieza a hacer calor ¡Pues también y ya lo pondreis el invierno que viene! ;)

This should have already been uploaded! But because spring was comming... but then the weather went cold again... I didn't know what to do! Anyway, if it's still cold where you live you can make this and wear it but if it's already hot... make it too and you'll wear it later!

...


¡Buenas! pues aquí estamos con el primer proyecto con los telares circulares, un gorro.

Hi! Here we are with the first project with the circular loom:


Vamos a necesitar un telar de unos 28cm de diámetro (si yo me equivoqué y cogí el de 23 creyendo que me iba a servir, pero el tejido encoge mucho y acabé deshaciendolo y volviendolo a hacer entero -.-") 100g de lana, la aguja de tejer y la de lana.

We are going to need a 28cm diameter loom, 100g of wool and the two needles.


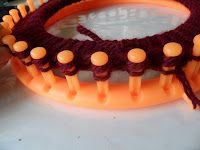
Comenzamos haciendo un nudo corredizo en el primer poste y ahora vamos dando una vuelta, del interior del telar hacia fuera, alrededor de todos los postes.

Start by making a knot at the first peg and now go around each of them, form the inside to the outside.


Cuando lleguemos al poste inicial pasamos el hilo por fuera del poste y sacamos por encima el punto de debajo. Continuamos haciendo esto entre 20 o 30 vueltas, dependiendo de como os guste.

When you arrive to the first peg pass the wool to the outside, take the stitch that is now at the bottom and pass it above you have made. Now you have to do about 20 or 30 rounds of this stitch, depending on how you like it.


Una vez las tenemos, hay que coger del comienzo los primeros puntos que hicimos, subirlos a su poste correspondiente y pasar el punto de debajo por encima, para unir ambos tejidos.

Once you finish with that you have to take the first stitches and put them up the the pegs again and pass the bottom stitch above this one.


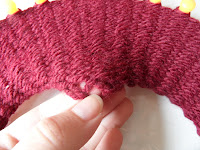
Ahora vamos a cambiar de punto, pero para que quede espeso tenemos que hacerlo con doble hilo, ¿cómo? buscad dentro de la madeja una bolita más pequeña en la que, si la deshaceis, encontrareis el cabo opuesto de la madeja. Ahora teneis que unirlo con el otro haciendo un nudo en el ultimo punto.

Now we're going to change the stitch, but this one has to be made with two threads, so it looks thick. For this you have to look for the other end of the thread into the skein and join it tiwh the other making a knot near the last stitch.


El nuevo punto es el mismo que hicimos en la primerisima vuelta al telar, hay que rodear los postes de dentro a fuera y luego sacar los puntos de debajo.

This stitch is the same that we did in the first round, you have to go arond the pegs, from the inside to the outside, and then pass the bottom stitches.


Bueno, y este es el momento en el que a Ceci se le ocurre probarse el gorro y se da cuenta de que no le sirve ¿Qué opción queda? deshacerlo y volver a empezar -.-"

And here's the moment when I realise that the hat is too small for me andhave to undo it and start again with a bigger loom -.-"


Una vez que acabemos toda la lana, vamos a cerrar el gorro, ¡Ya no queda nada!

When you reach the end of the thread, it's time to close it!


Vamos a coger el último punto que hicimos y con una aguja de ganchillo pasamos lo que sobra de hilo por el formando como otro punto.

Take the last stitch you've made and pass the thread making a loop.


Dejamos eso de lado y ahora vamos a ir sacando todos los puntos y poniéndolos en una aguja. Procura que sea grande, a mi al principio no me cabían todos y tuve que pasarlos todos a otra.

Leave this appart and now take all the stitches and put them into a needle, take a big one!


Cuando hayamos metido todos los puntos ponemos al final el punto que habíamos preparado antes y vamos pasando todos los puntos por dentro de este.

When you have all the stitches out take the one you made before, put it into the needle too and pass all the stitches inside this one.


Cuando ya hayamos pasado todos los puntos cogemos la hebra de lana final, la pasamos por dentro del punto y apretamos bien (como es el mismo hilo el punto se cerrará)

When you finish doing this take the end of the thread, pass it over the loop and pull.


Para acabar podemos hacer un par de nudos con la hebra restante y la aguja de lana y después cortamos lo que sobra ¡Y ya lo tenemos!

Now just make a few knots to secure it and then cut the thread that is left. And here you have it!


LinkWithin

Related Posts Plugin for WordPress, Blogger...