lunes, 29 de julio de 2013

Nail art: nailasaurus inspiration

¡Buenas! hoy vamos con un poco de nail art, que hacía mucho que no subía nada del tema.
La manicura ha tratado de ser una inspiración en nailasaurus, que al final no se que acabó siendo, pero la intención ahi queda XD.

Hi! today it's time for a bit of nail art. The manicure has tried to be inspirated in nailasaurus, but I don't know what it really looks like...


Otra de las razones porque la hice es que, al fin, he conseguido nail pearls, de estas para hacer la manicura caviar (a menudas horas...)
La manicura en si es una mezcla increíble de técnicas, tenemos glequins, degradado, striping tape...

Another reason to make this nailart was that I finally have nail pearls, so I wanted to try them.
The manicure itself it a huge mixture of techniques: glequins, gradient, striping tape...


La única uña que no me convencía del todo era la del índice. En un principio hice esta, con rayas hechas con las perlitas, pero me pareció un poco excesivo y lo acabé cambiando por la anterior, con un par de lineas con striping tape.

The only nail I wasn't sure about was the index finger. I tried different designs, this one was the first, and in the other photo the one that finally stayed.


Estos son los pintauñas que utilicé:
These are the nail polishes I used:

RARE, 001 milk
Essence, breaking dawn edition, 03 a piece of forever
claire's nail pearls
Essence, floral grunge edition, 01 be flowerful
Essence, 67 make it golden


domingo, 28 de julio de 2013

Noticias! / News!

¡Buenas! hago este pequeño post informativo porque ultimamente están apareciendo algunos proyectos mios mencionados en distintos sitios, cosa que a mi me hace muchisima ilusión, y me gustaría compartirlo con vosotros.

Hi! I'm writing this little post because lately I'm being mentioned in many sites and I'm thrilled about that, so I just wanted to share it with you.


  • La primera es una mención al colgante con nombre en buzzfeed, en una recopilación de varios DIY: 


The first mention is of my name necklace on buzzfeed:


The second one is of my treble clef ring on truebluemeandyou's tumblr:


  • Y por último, pero la que más ilusión me hace a mi, es mi cuarto featured project en cut out and keep, mi web de DIY favorita por todos los tiempos ^.^


And finally, but the one that is the most important to me, my fourth featured project oon cut out and keep, my ever-favorite DIY website.


¡Y eso es todo! echadle un ojo a las webs que merecen la pena y dan muchas ideas ;)


viernes, 26 de julio de 2013

5 fav #3

La selección de esta semana ;)

Ver #2


No me digais que no es una monada *.* y mejor aún si es de tu snack favorito, este cae!

Cute right? *.* and even more if it's of your favorite snack, I'll give this a try!


Una forma muy sencilla de hacer estampados

A very easy way to stamp your clothes


Pinterest (al menos mi tablón) ha explotado con las flores de papel! estas rosas son mis favoritas de entre todas.

Pinterest has exploded with paper flowers! these roses are my favorite from all of them.


No se que tienen, pero las pierdas decoradas de verdad que me encantan.

I don't know why, but I really love painted stones.


¡Este ultimo parece complicado! es hacer un efecto metalizado en las uñas con papel de aluminio, habrá que probarlo!

This last one looks difficult! It's making a metal effect with aluminium foil.

lunes, 22 de julio de 2013

DIY: flower crown

¡Buenas! Últimamente se ven muchas coronas de flores por la vida, y más ahora en verano (El el BBK las había a patadas) y aunque no soy de las personas que las llevaría por la calle, pero son taaaan bonitas... además, y esto es lo más importante, son muy divertidas de hacer!

Hi! flower crowns are getting very popular, even more now in summer (and specially in festivals, the BBK was full of them). I personally wouldn't wear one at the street without a reason, but they look soo pretty... and the most importat thing, they are fun to make!


Ya hay muchiiiisimos tutoriales de como hacer coronas de flores, y precisamente por eso es bastante dificil quedarse con uno. Yo os ahorro un poco de tiempo y voy a hacer una versión de el más sencillo que encontré, con los minimos materiales posibles.

There are already many tutorials on how to make these, but most of them are quite difficult to follow. I'm going to save you some time, and here's my version of the easiest tutorial I've seen, with the most simple materials.


Vamos a necesitar flores artificiales, como no. Para este tipo de corona vais a necesitar una flor base, que no sea demasiado grande y tenga un tallo muy largo, y luego el resto de flores que querais.

We are going to need fake flowers, of course. For this kind of crown you are going to need a base flower, not very big and with a long stem, and then all the other flowers you want.


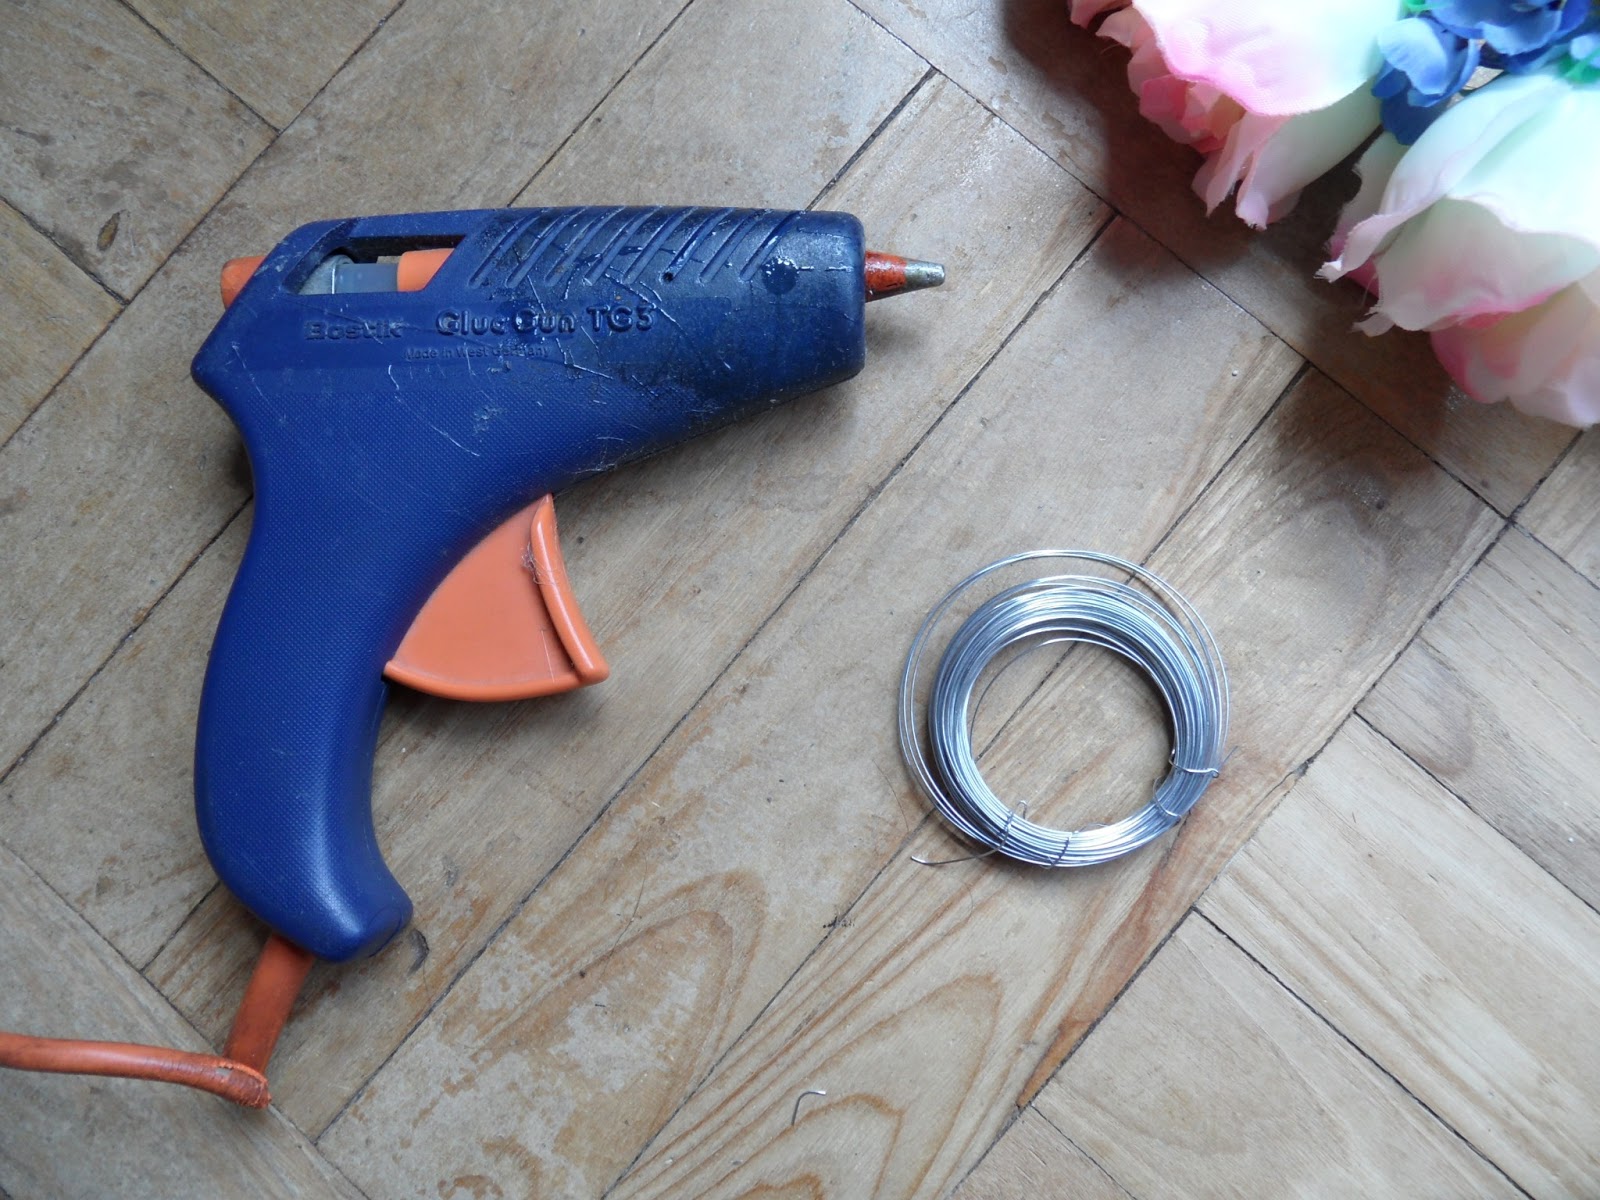
También vamos a necesitar una pistola de silicona y alambre, el más fino que encontréis, y si es de floristería mejor que mejor.

We are also going to need a glue gun and very thin wire.


Comenzamos cogiendo la flor base y vamos a usar el tallo para formar la corona, asi que hacemos con el un círculo del tamaño de nuestra cabeza, unimos los extremos y cortamos lo que sobre de tallo.

Start by taking your base flower. Create a circular shape of the size of your head with the stem, join the ends and cut the excess. Here we have the base of our crown.


Ahora sacamos del ramo las flores que vamos a añadir a la corona.

Now take form its bunch the rest of the flowers that you want to add.


Para asegurarlas tenemos dos opciones:

To put them into the crown we have two options:


Podemos pegar con silicona un trozo de alambre a cada flor para después enrollarlo a la corona, o podemos pegar la flor directamente con silicona.

We can glue a piece of wire to each flower, so we can wrap it to the crown, or we can glue the flower with silicon directly to the crown


El primer método es más seguro, pero también es más dificil ocultar luego todo el alambre. Pegar las flores con silicona es mucho más rápido, pero se pueden caer más facilmente.

The first method is safer, but it's also more difficult to hide the wire. Gluing the flowers with silicon is faster, but they can fall easily.


Para terminar la corona se puede añadir por la parte de atrás unas hojas, para que quede más bonito pero también para ocultar alambres y demás.

As a final touch you can add some leaves, so it looks better, but also to hide the wire and other things.


¡Y ya las teneis! yo hice estas dos coronas, las dos muy distintas, tanto en colores como en método. La roja es la mia y hice la otra para una amiga, también bloguera, María.

And here's the final reslut! I've made two, the red ones is mine and the other was for a friend of mine, María.


Para terminar os dejo una foto con la corona puesta, para que veais como queda (foto por otra amiga, Eva)

Here's a photo of we wearing the crown, so you see how it looks (photo by other firend, Eva)


viernes, 19 de julio de 2013

5 fav #2

Vamos con las segunda semana =D

Ver #1


Me ENCANTA este tipo de diseños, pero nunca se donde ponerlos en práctica... ¿alguna sugerencia?
I LOVE this kind of patterns, but I never know where to apply it, any ideas?


Es una buena idea si tus zapatillas blancas ya están demasiado sucias :b
It's a good idea if your white sneakers are very dirty :b


Quiero uno para mi móvil, son tan monos T.T
I want one, they're so cute T.T


Los puntos siempre pueden dar mucho juego
You can always use dots  in many different ways


Como conseguir plástico que se encoge en el horno a partir de bandejas de alimentos, es una buena forma no solo de reutilizar, sino de ahorrarse un dinero ;)
How to get shrink plastic out of food trays, you recycle and also save some money ;)


lunes, 15 de julio de 2013

DIY: riot t-shirt

¡Buenas! hoy os vengo a enseñar uno de mis primeros diseños de camiseta. Lo tenía en mente desde hace un tiempo, pero finalmente me decidí a hacerla para poder llevarla al BBK, espero que os guste!

Hi! today I'm showing you one of my first t-shirt designs. I finally decided to make it real because I wanted something cool to bring to the BBK :b, I hope you like it!


Los materiales que usé fueron: una camiseta gris básica, pintura textil negra, rotulador textil negro y pinceles.
Como yo siempre tengo mucho miedo de estropear la camiseta primero marquñe un poco el diseño con tiza para hacerme una idea (en la foto se nota un poco)

The materials are: a basic grey t-shirt, fabric paint and pen, and some brushes.
I always have the fear of messing up the t-shirt, so first I draw the design with chalk.


Mi idea principal era que la letra fuera un poco más grafitti, pero la tela era algo dificil de pintar asi que tuve que hacer lo que pude, de todas formas, estoy bastante satisfecha con el resultado ¡Ya os enseñaré algunas fotos de ella en el festival!

My  first idea was more like a graftti, but the fabric was a bit difficult to paint on and it ended up more like this, anyway I'm really happy with the result

martes, 9 de julio de 2013

Me voy al BBK live!!

¡Buenas! una entrada muy breve solo para comentaros que me voy de vacaciones a Bilbao, y entre otras cosas ¡al festival BBK live!

Hi! just a quick post to let you know that I'm going on holday to Bilbao, and also to the BBK live festival!!


Es la primera vez que voy a un concierto (ahi, a lo grande) y ahora mismo estoy nerviosisima!
Bueno, en fin, he dejado entradas listas para la semana y trataré de hacer un post recopilación cuando llegue. Espero que vosotros también tengais planes y que lo paseis muy bien ;)

This is the first time ever I'm going to a festival (thinking big) and right now I'm really nervous!!
Anyway, I have some posts ready for the week, and I may do a post about the experience when I come. I hope you have great plans too, and have fun ;)

lunes, 8 de julio de 2013

Cambio de imagen!

¡Buenas! ya que no publiqué nada el mes pasado ahora voy a saturar esto un poco de entradas ;)
Y hoy quería hablaros de mi reciente cambio de imagen, ¡Me he teñido el pelo de verde! jajaja llevaba muchisimo tiempo queriendo darle algo de color o hacer algo raro, y por fin me he lanzado.

Hi! as last month I didn't publish anything this I'm going to post a bit more than usual ;)
Today I wanted to show you my new hair, I dyed it green! I've wanted to do something crazy with it for a long time, and I've finally done it!


Aqui teneis el resultado, 100% hecho en casa *.*

Here you have the result, 100% self-made *.*


Bueno, os cuento un poco el proceso. Lo primero que hice fue escalarme un poco las puntas porque las tenía todas la misma longitud y asi el pelo no se rizaba bien y demás no quedaba guapo. He de decir que era la primera vez que hacía algo parecido(ya me había cortado el flequillo en casa pero el pelo entero es diferente) y me quedó algo desigual, pero di tu que como luego riza no se nota :b

Ok, I'm going to tell you a bit about the process. I started by cutting a bit the tips so they didin't have the same lenght. I have to say that it was the first time I was doing something like this and it ended a bit uneven, but anyway, as my hair is curly it isn't noticeable.


Como tengo el pelo muy oscuro el siguiente paso era decolorar. Decidí hacerlo como si fuera a hacer mechas californianas para que si al final me echara atrás con el color no quedara muy feo. Usé un sobre de decolorante y oxigenada del 40 y lo dejé como media hora. 

The next step was bleaching. I decided to make it as if they were highlights in the case I didin't dye it in the end. I used one packet of bleach and peroxide of 40 vol. and I left it for about half an hour.


Dos consejos que os puedo dar tras esta primer experiencia:
Cardad muy bien los mechones para que el color quede desigual y el cambio de tono se vea degradado.
¡Trabajad rápido! a mi me quedó la parte izquierda mas clara que la derecha porque es la primera en la que puse el decolorante y la que lo tuvo más tiempo.

Two little tips for bleaching:
Backcomb the hair really well, that's the trick to make a soft change between dark and light colour.
Work fast! my hair in the left is lighter than the one in the right because that's where I started bleaching and it had the bleach for a longer time.


Después de la decoloración dejé descansar el pelo un par de días y tras ese tiempo ¡Es hora de darle color! Esta vez me prestó una amiga los tintes que ella tenía, me acabé decidiendo por el "peacock blue" que en mi opinión es más un verde, pero que de todas formas es precioso.  Para teñir el pelo estaba un poco desganada y como podeis ver en la primera foto se me pasaron algunos mechones, pero no voy a decir que quede mal precisamente ;)

After bleaching the hair I let the hair rest for a few days and then, it was time to give ti colour! A friend of mine lend me the dyes she had, and I chose "peacock blue". For me it's more like a green, but anyway it's really bautiful. When I dyed I was a bit lazy and I forgot some locks, but it doesn't look bad at all!


¡Y esta es mi experiencia! espero que ayude o anime a alguna que otra a lanzarse a hacer algún cambio en el pelo por ella misma ¡el verano esta para eso!

And this is my experience! I hope this helps to somebody, don't be afraid and experiment with your hair!


viernes, 5 de julio de 2013

5 fav #1

¡Buenas! hoy comienzo una nueva sección en la que llevaba pensando un tiempo: cada semana os voy a enseñar 5 proyectos o ideas que me hayan gustado o inspirado ¡Espero que a vosotros también!

Hi! today begins a new section on the blog: every week I'm going to feature 5 projects or ideas that I like or that inspire me, I hope you too!


Imanes para nevera que son corchos transformados en tiestos, una cucada ^.^
little cork pots, how cute!


Estampado de gato DIY
DIY cat stamp


Puntas de colorines *.* el degradado es precioso
love dyed tips, specially the ombre


Es como la pulsera cinta métrica pero en una versión más resistente!
It's like the measure tape bracelet!


Una buena idea para hacer ombre nails si no tienes los suficientes colores
A good idea if you want ombre nails but you don't have enough polishes

lunes, 1 de julio de 2013

cartoon nails

¡hola buenas!
Hi there!


Tras este gran parón debido a exámenes finales y demás (tal vez os cuente en otro post ;b) retomamos con una mani, para ir pillando ritmo para el verano.

Sorry about this little break, I?ve been full of exams and many other things (I may tell you some inanother post ;b). Today we start the summer season with nail art.


Vi esta idea en un video de youtube y me encanto, ¡Parecen de mentira!
Las hice ya hace un tiempo y creo que perdí el resto de las fotos (soy un desastre -.-) pero os comento como se hacen, que es bien fácil:
Se pintan las uñas de un color nude-rosita si quieres que parezcan naturales, también se pueden hacer se cualquier otro color. Luego se marca con negro todo el contorno se la uña, para que parezca que está dibujada y se añade en blanco una rayita y un punto como si fuera fuera un brillo. Acaba con un top coat mate para que de más aspecto de dibujo.


I saw this idea on youtube and I love it! they seem like real cartoon!
I made them a while ago and I lost the photos of he process (I'm soo untidy...) but anyway, they're really easy to do.

Paint your nails with a nude-pink colour if you want them to look realistic, but you can use any colour you want. Then you have to contour the nail with black and add in one side a stripe and a dot as if ti was the shine. To make it more like a cartoon add a mate top coat.


¡Ya vereis como la gente os pregunta por ellas! a mi me pasó un par de veces XD

¡Y con esto arranca la temporada de verano! tengo miles de ideas nuevas para este año (ahora que por fin tengo el tiempo) y algunas ya están en marcha, asi que esperad por ellas ;)

LinkWithin

Related Posts Plugin for WordPress, Blogger...